
Virtual machine for windows 7 virtualbox. VirtualBox creating virtual machines
Since we all love to experiment, dig into the system settings, run something of our own making, it is necessary to think about a safe place to experiment. Such a place for us will be a VirtualBox virtual machine with Windows 7 installed.
When starting the VirtualBox virtual machine (hereinafter referred to as VB), the user sees a window with a completely Russian-language interface.
Recall that when you install the application, the shortcut is automatically placed on the desktop. If this is your first time creating a virtual machine, in this article you will find detailed instructions which may be useful at this stage.
So, in a new window, click "Create", after which you can select the OS name and other attributes. You can choose from all available operating systems.
Go to the next step by clicking Next. Now you need to specify how much RAM to allocate to the VM. For its normal functioning, 512 MB is enough, but you can choose more.

Then we create a virtual HDD. If you have previously created discs, you can use them. However, in the same article, we will focus on how they are created.
We mark the item "Create a new hard drive" and move on to the next steps.


In a new window, you need to specify where the new disk image should be located and how large it is. If you are creating a boot disk containing Windows 7, then 25 GB is enough (this figure is set by default).

As far as accommodation is concerned, best solution will place the drive outside of the system partition. Failure to do so may result in an overloaded boot drive.
If everything suits, click "Create".
When the disk is created, the parameters of the created VM will be displayed in a new window.

Now you need to configure the hardware of the virtual machine.
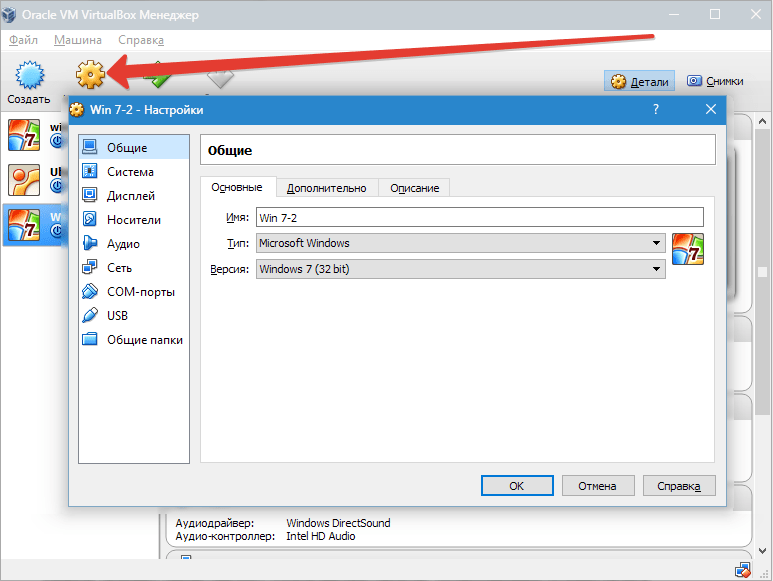
In the "General" section, the 1st tab displays key information about the created machine.
Let's open a tab "Additionally". Here we will see the option "Picture Folder". It is recommended to place the specified folder outside the system partition, since the snapshots are large.
"Shared Clipboard" implies the operation of the clipboard when interacting with your host OS and VM. The buffer can work in 4 modes. In the first mode, the exchange is made only from the guest operating system to the main one, in the second - in the reverse order; the third option allows both directions, and the fourth disables communication. We choose the bidirectional option as the most convenient.
"Mini toolbar" is a small panel that allows you to manage the VM. This console is recommended to be activated in full screen mode, since the main menu of the working window of the VM repeats it entirely. The best place for it is at the top of the window, because that way there is no risk of accidentally pressing one of its buttons.

Let's go to the section "System". The first tab offers to make certain settings, which we will discuss below.
1. If necessary, adjust the amount of VM RAM. At the same time, only after its launch it will become completely clear whether the volume is chosen correctly.
When choosing, you should start from the amount of physical memory installed on the computer. If it is equal to 4 GB, then it is recommended to allocate 1 GB for the VM - it will function without "brakes".
2. Let's determine the order of loading. A floppy disk (floppy) player is not needed, turn it off. The first in the list should be assigned a CD / DVD drive in order to be able to install the OS from a disk. Note that this can be physical disk, as well as a virtual image.

See the reference section for other settings. They are closely related to the hardware configuration of your computer. If you set settings that are not consistent with it, the VM will not start.
Bookmark "CPU" the user specifies how many cores are on the virtual motherboard. This option will be available if hardware virtualization is supported. AMD-V or VT-x.
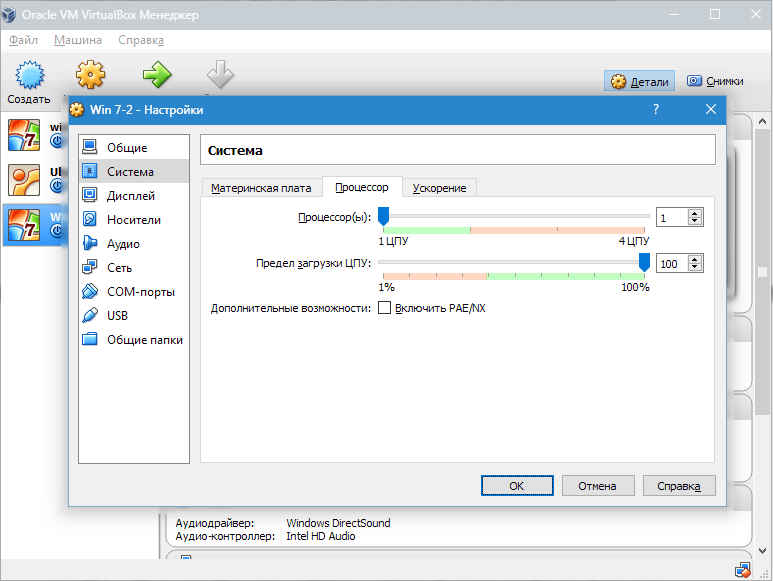
Regarding hardware virtualization options AMD-V or VT-x, then before activating them, you need to find out if these functions are supported by the processor and whether they are originally included in BIOS– it often happens that they are disabled.

Now consider the section "Display". Bookmark "Video" indicates the amount of memory of the virtual video card. Activation of two-dimensional and three-dimensional acceleration is also available here. The first of them is desirable to include, and the second parameter is optional.

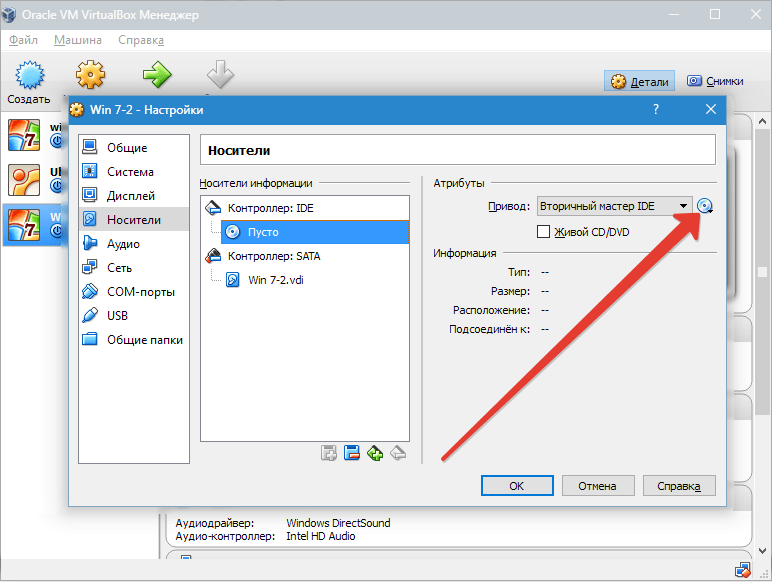
In chapter "Carriers" all disks of the new virtual machine are displayed. Also here you can see a virtual drive with the inscription "Empty". We will mount the image into it installation disk Windows 7.

The virtual drive is configured as follows: click on the icon located on the right. A menu opens in which we click "Select Optical Disc Image". The next step is to add the operating system boot disk image.

We will not cover network issues here. Note that network adapter is initially active, which is a prerequisite for the VM to access the Internet.
On the section COM there is no point in dwelling in detail, since nothing is connected to such ports today.
In chapter USB check both available options.
Let's go to "Shared Folders" and select the directories to which the VM is planned to provide access.
The entire setup process is now complete. Now you can start installing the OS.
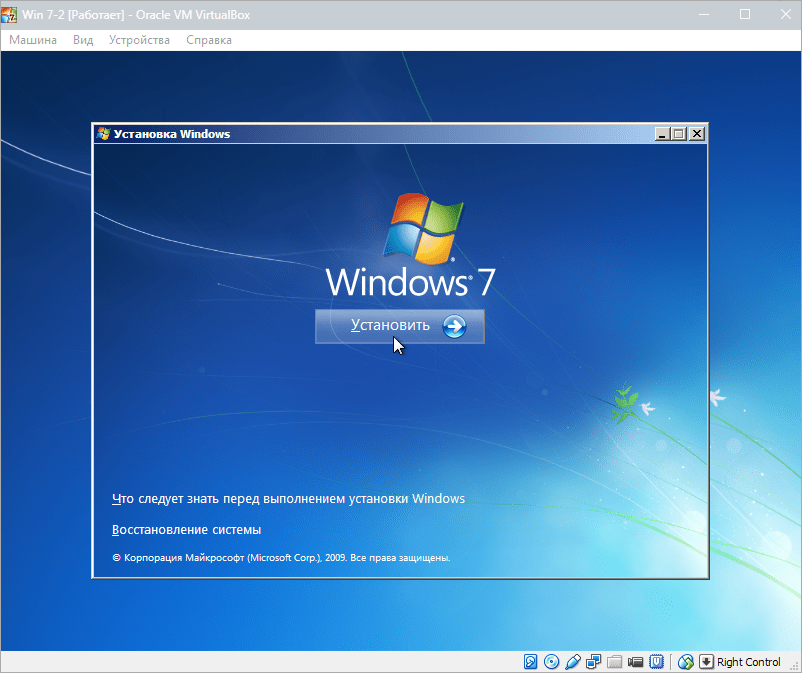
Select the created machine in the list and click "Run". Herself Windows installation 7 on VirtualBox is very similar to normal installation Windows.
After downloading the installation files, a window with a choice of language will open.

We accept the terms of the license.

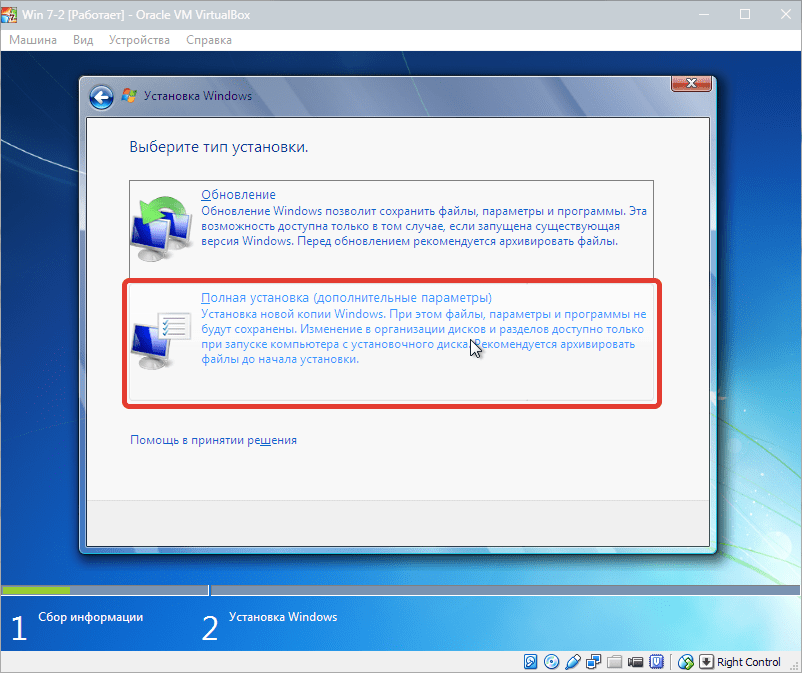
Then choose "Full installation".
In the next window, you need to select a disk partition for installing the operating system. We have only one section, so we select it.


During installation, the machine will automatically restart several times. After all reboots, enter the desired username and computer.


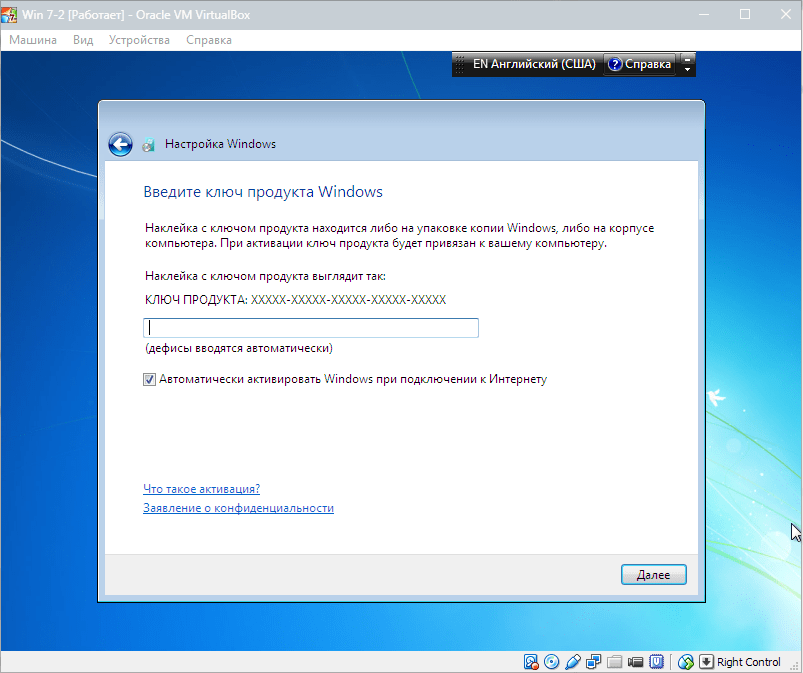
Here we enter the product key, if any. If not, then just click "Further".
Set the timezone and date.

Then we choose which network to attribute our new virtual machine to. Click "Home".

After these steps, the virtual machine will automatically reboot and we will get to the desktop of a freshly installed Windows 7.
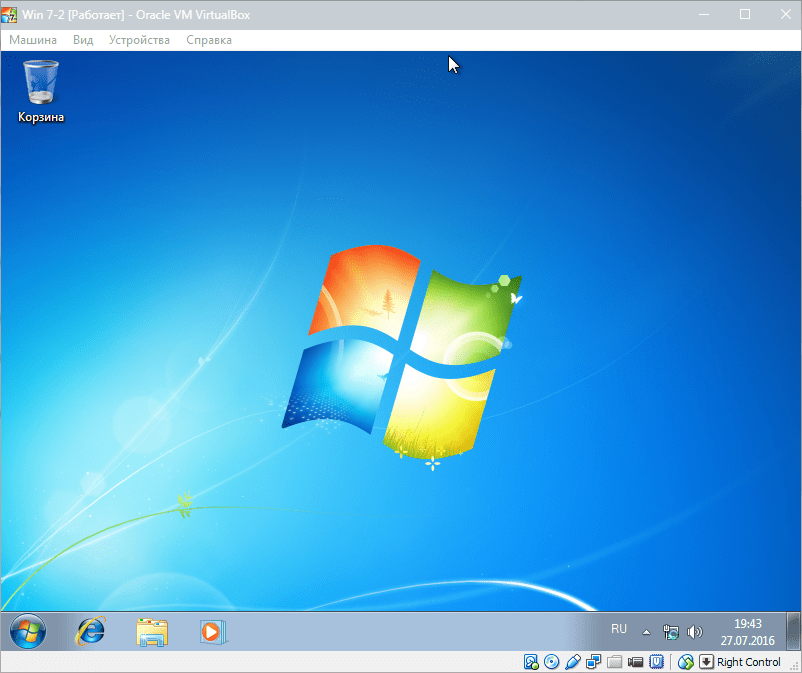
Thus, we installed Windows 7 on the VirtualBox virtual machine. Then it will need to be activated, but this is a topic for another article ...
virtual box- a special program for creating virtual computers in PC memory. Each virtual computer can contain an arbitrary set of virtual devices and a separate operating system. The scope of virtual computers is very wide - from performing software testing functions to creating entire networks that are easy to scale, distribute the load and protect. VirtualBox is free and open source.
System requirements:
Windows Server 2008 (64-bit)
Windows Server 2008 R2 (64-bit)
Windows 7 (32-bit and 64-bit)
Windows 8 (32-bit and 64-bit)
Windows 8.1 (32-bit and 64-bit)
Windows 10 RTM build 10240 (32-bit and 64-bit)
Windows Server 2012 (64-bit)
Windows Server 2012 R2 (64-bit)
Windows Server 2016 (64-bit)
Torrent Virtual PC - VirtualBox 5.2.10.122406 Final + Extension Pack in detail:
There are versions of VirtualBox designed to be installed on almost all operating systems ah, including Windows, Linux, Macintosh and OpenSolaris. Any operating system can also be used as a "guest" operating system, including Windows (NT 4.0, 2000, XP, Server 2003, Vista, W7), DOS/Windows 3.x, Linux, and OpenBSD.
Key Features:
·VirtualBox can be controlled both through the GUI-interface and through the command line.
· To expand the functions of the program, a special SDK kit has been developed.
·Options virtual machines are described in XML format and do not depend in any way on the physical computer on which the system is running. Therefore, virtual computers of the VirtalBox format are easy to transfer from one PC to another.
· When using Windows or Linux operating systems on "guest" computers, you can use special utilities that make it much easier to switch between physical and virtual computers.
·To quickly exchange files between the guest and physical PC, you can create so-called "shared folders" (Shared folders), which are simultaneously available from both of these machines.
·VirtualBox allows you to connect USB devices to virtual computers, allowing virtual machines to work with them directly.
VirtualBox fully supports the protocol remote access RDP (Remote Desktop Protocol). The virtual machine can act as an RDP server, allowing you to manage it remotely.
The Extension Pack adds the following features:
The virtual USB 2.0 (EHCI) device.
The virtual USB 3.0 (xHCI) device.
VirtualBox Remote Desktop Protocol (VRDP) support.
Host webcam passthrough.
Intel PXE boot ROM.
·Experimental support for PCI passthrough on Linux hosts.
Disk image encryption with AES algorithm.
·Installation:
Option number 1.
- Launch VirtualBox, go to File » Settings » Plugins and add the downloaded file with the extension .vbox-extpack
Option number 2.
- After installing VirtualBox, double click Oracle_VM_VirtualBox_Extension_Pack.vbox-extpack.
Note: In the event that the file has a green icon or the file was associated during the installation of VirtualBox.
Computer users sometimes find themselves in a situation where they need to work with older programs that worked well on previous versions of Windows. Managing two computers at once is not always convenient. But it is possible to install another edition of the operating system on a working laptop. Parallel operation of two systems can be provided by a virtual machine for Windows 7 (VM). From this article you can find out:
- what is VM;
- what programs exist for this purpose;
- how to install and configure Windows 7 in a VM.
The second computer is real
Virtual machine- software. With it, a copy of a real computer is created with:
- hard virtual disks;
- optical software drive;
- analogue of network adapters;
- BIOS, etc.
A virtual laptop with its own operating system runs in a separate window and occupies a certain amount of space on a physical hard drive. It looks like this:
The example shows how in a real operating system with installed Windows 7 Professional, the program works with the Windows XP virtual operating system. And it performs the same actions as on a real device.
VM Tasks
Almost everyone is faced with a situation where downloaded from the network and installed program pulls a trail of unnecessary applications. That is why more advanced users prefer to install the downloaded application in a virtual system and check it, both for performance and for unexpected surprises.
In addition, other tasks are solved:
- Opportunity to test the program.
- Avoid harmful effects from suspicious programs.
- Emulate a second computer network.
- Check the consequences of changing the settings in the system.
- Safely perform autosurfing over the network.
- Reduce the likelihood of computer viruses infecting a real laptop.
- Running programs that are incompatible with the actual operating system.
Most popular emulators
You can find many programs with which it is possible to create a virtual Windows. But it is best to get acquainted with the most popular of them.
This is the most common free program, with which you can emulate the most popular operating systems:
- Windows(with support for different versions).
- macOS.
- Any operating system from the family linux.
- Interaction with VM from the paid version of the emulator is supported VMware Workstation.
Windows 7 and the created virtual machine are easily configured by a regular user. The program differs both in performance and stability. In addition, despite its free of charge, it has ample opportunities, clear interface. It is better than others adapted for home use.
VMware
Also known and popular program. It has found its main application in large corporations.
There are two versions of this product:
- workstation;
- Player.
Version workstation will be able to fully satisfy the needs of the user, but this is a paid program. General users can use free analogue workstation - VMware Player.
The paid version supports work with systems 32 and 64, sees USB 3.0, various operating systems work quite successfully. VMware Workstation- an advanced version of a computer emulator, but due to its cost, it has found its use mainly among large companies, and not among ordinary users.
Microsoft Virtual PC
A similar virtual machine for working in Windows 7. It has wide functionality and a clear, convenient and practical interface. But there is also a significant disadvantage - it can only work with operating systems of the Windows family. Other operating systems, such as Linux or Mac OS, will not run on it.
In that summary three most popular virtual machines are described. Now it is clear that for home needs it is best to use the program. Next, the procedure for its installation and configuration will be considered.
Installing Windows 7 in a VirtualBox virtual machine
The process of installing a virtual operating system can be divided into several stages:
- Install the program .
- Download file with Windows 7 image for VM.
- Installation virtual Windows 7.
Let's consider all these processes separately.
Install the VirtualBox program
First of all, you need the virtual machine itself. As already mentioned, there are several. We are interested in . You can download it from the official website https://www.virtualbox.org. From the proposed list, select VirtualBox 5.1.14 for Windows hosts.

The process of how to install a virtual machine is described in other articles, but there are a few points:

After the Internet connection is restored, you can start downloading and installing the finished VM file in Windows 7.

Finding a finished VM
Microsoft for the purpose of testing various versions Internet Explorer(8, 9, 10, 11) has specially prepared several options for downloading from its website a VM with a preinstalled Windows versions(7; 8.1; 10) https://developer.microsoft.com/en-us/microsoft-edge/tools/vms/ . If this link is not available, the browser will automatically redirect to the English version of the site https://developer.microsoft.com/en-us/microsoft-edge/tools/vms/

So, first you need to select a Windows 7 image with any version of IE (8, 9, 10, 11).

We select from the drop-down list the item which virtual machine will undoubtedly be used. In our case, this is .

And click on the Download .zip button. The zip file download process will begin.

It remains to install and run a virtual machine on Windows 7.
Adjustment of virtual Windows 7
The virtual Windows file itself is extracted from the "IE10.Win7.For.Windows.VirtualBox.zip" archive. 
Once the file is extracted, right click on it.  and from the drop-down list we stop our choice on " To open with».

In principle, nothing needs to be changed in the import parameters. You can leave it as is and click the Import button.

The configuration process will start. The "" window looks like this:

After the process is over, the new seven and VM will appear in the program list. To launch it, it is enough to either double-click on the VM itself, or click on the button with the arrow “ Run". The process of starting the operating system will immediately begin. If installing for the first time, it will take a little longer, however, the same thing happens when installing a real OS. Once the setup program has completed all the necessary steps, a desktop with a working Windows 7 system will appear.

Windows 7 in English and the created virtual machine are ready to run.

Set up a virtual system
All VM controls are intuitive. But if you have any questions, you should carefully read the tooltips in Russian. You can turn to help for help, where you can find answers to all questions.
Usually, both the mouse and the keyboard only work in the VM and are blocked in real Windows. But it is possible to switch between the two systems using the Right Control host key.
Now that the virtual machine is installed and running, you can configure Windows. The first step is to install software components (drivers) for all virtual devices. This process is quite simple. You need to go to the main menu and in the line " Devices" click on " Install Guest Additions».
After the installation is complete, the VM is rebooted. Now the picture has become clearer, the VM window can be dynamically changed, support for mouse integration will be connected, and Internet access will open.
There is also the possibility of extending the function of the displays. In this mode, windows that are opened in the VM will be displayed on the real desktop, and not in a separate program window. This makes it possible to facilitate access to all controls and installed programs of the VM.
Shutdown virtual Windows 7
Like a real laptop in a VM, Windows installed requires a certain order to be completed. You can end the job by pressing the button to stop the job. A menu will open with three options for closing the VM.

« Save machine state» - before shutting down, the machine will save all running applications at the time of shutdown. When the VM is turned on again, work in it can be continued from the moment it was turned off.
« Send a shutdown signal» - all applications can be closed and the machine will turn off automatically.
« Turn off the car” - just as if a real computer were de-energized.
Conclusion
From this short overview, it can be seen that working with virtual machines, such as, makes it possible to connect several different operating systems at once on one device. Naturally, the more powerful the real device will be ( RAM and CPU), the faster virtual computers will also run. Disabling the antivirus on the native machine or if it is on the exclusion list will also help speed up the work. antivirus program add virtual directory.
Related videos
The name of the program: virtual box
Program version: 6.0.6 Build 130049 Final
latest version programs: 6.0.2 Build 128162
Release year: 2019
Official site: virtualbox.org
Interface language: Russian, English, and others
Treatment: Not required
System requirements:
- Windows Vista SP1 and later (32-bit and 64-bit).
- Windows Server 2008 (64-bit)
- Windows Server 2008 R2 (64-bit)
- Windows 7 (32-bit and 64-bit)
- Windows 8 (32-bit and 64-bit)
- Windows 8.1 (32-bit and 64-bit)
- Windows 10 RTM build 10240 (32-bit and 64-bit)
- Windows Server 2012 (64-bit)
- Windows Server 2012 R2 (64-bit)
Description:
VirtualBox is a special program for creating virtual computers in PC memory. Each virtual computer can contain an arbitrary set of virtual devices and a separate operating system. The scope of virtual computers is very wide - from performing software testing functions to creating entire networks that are easy to scale, distribute the load and protect. VirtualBox is free and open source.
There are versions of VirtualBox designed to be installed on almost all operating systems, including Windows, Linux, Macintosh, and OpenSolaris. Any operating system can also be used as a "guest" operating system, including Windows (NT 4.0, 2000, XP, Server 2003, Vista, W7), DOS/Windows 3.x, Linux, and OpenBSD
VirtualBox can be controlled both through the GUI and through the command line.
To expand the functions of the program, a special SDK has been developed.
The parameters of virtual machines are described in XML format and do not depend in any way on the physical computer on which the system is running. Therefore, virtual computers of the VirtalBox format are easy to transfer from one PC to another.
When using Windows or Linux operating systems on "guest" computers, you can use special utilities that make it much easier to switch between physical and virtual computers.
To quickly exchange files between a guest and a physical PC, you can create so-called "shared folders" (Shared folders), which are simultaneously available from both of these machines.
VirtualBox allows you to connect USB devices to virtual machines, allowing the virtual machines to work with them directly.
VirtualBox fully supports the RDP (Remote Desktop Protocol) remote access protocol. The virtual machine can act as an RDP server, allowing you to manage it remotely.
The virtual USB 2.0 (EHCI) device; see the section called “USB settings”.
VirtualBox Remote Desktop Protocol (VRDP) support; see the section called “Remote display (VRDP support)”.
Intel PXE boot ROM with support for the E1000 network card.
Experimental support for PCI passthrough on Linux hosts; see the section called “PCI passthrough”.
Installation:
Launch VirtualBox, go to File » Settings » Plugins and add the downloaded file with the extension .vbox-extpack
This is a service version. The following items have been fixed and/or added:
Virtualization core: support for Shanghai / Zhaoxin processors.
User interface: handle arguments correctly command line for VirtualBox (bugs #18206 and #18197)
User Interface: Improvements in Machine Manager, Virtual Optical Disk Creation, Storage Selection, and Log Viewer
User Interface: Various minor fixes and improvements
Audio: Implemented scheduling for AC"97 device emulation to synchronize audio and video
Graphics: Basic VMSVGA graphics device support in virtual machines using EFI
Networking: Fix occasional NATNet crashes (Bug #13899)
Networking: Worked around issues with some PCnet drivers on older operating systems
Serial: fixed connection to pseudo terminals on POSIX hosts (6.0.0 regression; bug #18319)
Linux hosts and guests: fix for building kernel modules under Linux 5.0. Thanks Kyle Laker
Network and server administrators are often faced with the need to test equipment, software and certain parameters and settings on real servers. But testing something on a live server is extremely dangerous, as it can lead to data loss and malfunction.
Specialized software comes to the rescue in this situation. Able to emulate a real computer and perform all the necessary actions with it. The most popular program in this case is VirtualBox from Oracle.
How to use virtualbox?
virtualbox 32/64 bit for windows 7 and 8 must be installed on a working computer running the Windows operating system. In the future, VirtualBox allows you to create any number of virtual machines with the selected parameters, and install any operating systems on them for testing. In this case, the real physical computer will be host, and the operating system on it will be host.
When installing an operating system on a virtual machine, you should pay attention to the fact that it must be configured properly and meet the minimum requirements. In this case, the operating system installed on the virtual computer is called the guest operating system.

Thanks to the use of virtual machines, it is much easier to test hardware, software, and the necessary settings. With all this, the virtual and physical machines communicate with each other through a network connection. In addition, a virtual machine can take control of any hardware installed on a physical computer.
The program is also available for operating systems such as MacOS and Linux (popular for Ubuntu and Mint).